안드로이드 스튜디오 Bottom Navigation 구현하기
- Android Studio
- 2020. 6. 1.
계발에서 개발까지
Bottom Navigation 구현하기
하단 네비게이션 바를 사용하면 사용자가 한 번의 탭으로 최상위 뷰를 쉽게 탐색하고 전환할 수 있습니다.
build.gradle(app) 추가하기
하단 네비게이션을 사용하기 위해 앱 수준에 추가시켜줍니다.
dependencies {

  implementation 'com.google.android.material:material:1.0.0'


}
구성
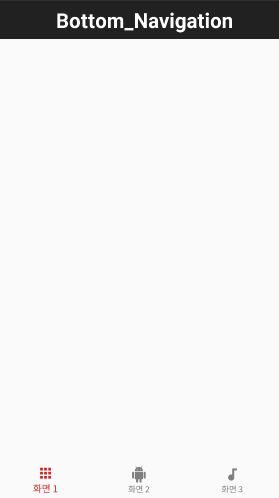
저는 이런식으로 하단에 3가지의 페이지를 만들어 버튼을 클릭 시 해당 페이지로 이동하게끔 기능을 구현하겠습니다.
activity_main.xml
<?xml version="1.0" encoding="utf-8"?>
<LinearLayout xmlns:android="http://schemas.android.com/apk/res/android"
    xmlns:app="http://schemas.android.com/apk/res-auto"
    xmlns:tools="http://schemas.android.com/tools"
    android:layout_width="match_parent"
    android:layout_height="match_parent"
    android:orientation="vertical"
    tools:context=".MainActivity">

    <com.google.android.material.appbar.AppBarLayout
        android:layout_width="match_parent"
        android:layout_height="wrap_content">

        <androidx.appcompat.widget.Toolbar
            android:id="@+id/toolbar"
            android:layout_width="match_parent"
            android:layout_height="?attr/actionBarSize"
            android:background="?attr/colorPrimary"
            android:theme="@style/Theme.AppCompat">

          <TextView
              android:gravity="center"
              android:layout_width="match_parent"
              android:layout_height="match_parent"
              android:text="Bottom_Navigation"
              android:textStyle="bold"
              android:textColor="#fff"
              android:textSize="30dp" />

        </androidx.appcompat.widget.Toolbar>

    </com.google.android.material.appbar.AppBarLayout>


    <FrameLayout
        android:id="@+id/content_layout"
        android:layout_width="match_parent"
        android:layout_height="0dp"
        android:layout_weight="1" />

    <com.google.android.material.bottomnavigation.BottomNavigationView
        android:id="@+id/nav_view"
        android:layout_width="match_parent"
        android:layout_height="wrap_content"
        android:background="?android:attr/windowBackground"
        app:itemIconTint="@color/selector_bottom_nav_color"
        app:itemTextColor="@color/selector_bottom_nav_color"
        app:menu="@menu/bottom_nav" />


</LinearLayout>
메인 레이아웃입니다 바텀네비게이션부와 프래그먼트를 사용하여 3가지의 레이아웃을 만들겠습니다.
fragment_page_1.xml
<?xml version="1.0" encoding="utf-8"?>
<LinearLayout xmlns:android="http://schemas.android.com/apk/res/android"
    xmlns:app="http://schemas.android.com/apk/res-auto"
    xmlns:tools="http://schemas.android.com/tools"
    android:layout_width="match_parent"
    android:orientation="vertical"
android:gravity="center"
    android:layout_height="match_parent">


    <TextView
        android:layout_width="wrap_content"
        android:layout_height="wrap_content"
        android:text="Page_1"
        android:textSize="100dp"/>


</LinearLayout>
fragment_page_2.xml
<?xml version="1.0" encoding="utf-8"?>
<LinearLayout xmlns:android="http://schemas.android.com/apk/res/android"
    xmlns:app="http://schemas.android.com/apk/res-auto"
    xmlns:tools="http://schemas.android.com/tools"
    android:layout_width="match_parent"
    android:layout_height="match_parent"
    android:gravity="center"
    android:orientation="vertical">

    <TextView
        android:layout_width="wrap_content"
        android:layout_height="wrap_content"
        android:text="Page_2"
        android:textSize="100dp"/>


</LinearLayout>
fragment_page_3.xml
<?xml version="1.0" encoding="utf-8"?>
<LinearLayout xmlns:android="http://schemas.android.com/apk/res/android"
    xmlns:app="http://schemas.android.com/apk/res-auto"
    xmlns:tools="http://schemas.android.com/tools"
    android:layout_width="match_parent"
    android:layout_height="match_parent"
    android:gravity="center"
    android:orientation="vertical">

    <TextView
        android:layout_width="wrap_content"
        android:layout_height="wrap_content"
        android:text="Page_3"
        android:textSize="100dp"/>


</LinearLayout>
이렇게 3개의 레이아웃을 구성해주면 됩니다. 이제 하단 버튼에 쓰일 메뉴를 만들겠습니다.
res-menu폴더를 생성한후 그 안에 xml을 구성합니다.
bottom_nav.xml
<?xml version="1.0" encoding="utf-8"?>
<menu xmlns:android="http://schemas.android.com/apk/res/android">

    <item
        android:id="@+id/navigation_1"
        android:icon="@drawable/ic_apps_black_24dp"
        android:title="화면 1" />

    <item
        android:id="@+id/navigation_2"
        android:icon="@drawable/ic_android_black_24dp"
        android:title="화면 2" />

    <item
        android:id="@+id/navigation_3"
        android:icon="@drawable/ic_audiotrack_black_24dp"
        android:title="화면 3" />

</menu>
여기서 쓰인 icon 이미지나 title 글은 직접 사용하실 걸로 정해주시면 됩니다.
이제 MainActivity를 구성하겠습니다.
MainActivity.java
public class MainActivity extends AppCompatActivity {
    private BottomNavigationView mBottomNV;

    @Override
    protected void onCreate(Bundle savedInstanceState) {
        super.onCreate(savedInstanceState);
        setContentView(R.layout.activity_main);

        mBottomNV = findViewById(R.id.nav_view);
        mBottomNV.setOnNavigationItemSelectedListener(new BottomNavigationView.OnNavigationItemSelectedListener() { //NavigationItemSelecte
            @Override
            public boolean onNavigationItemSelected(@NonNull MenuItem menuItem) {
                BottomNavigate(menuItem.getItemId());


                return true;
            }
        });
        mBottomNV.setSelectedItemId(R.id.navigation_1);
    }
    private void BottomNavigate(int id) {  //BottomNavigation 페이지 변경
        String tag = String.valueOf(id);
        FragmentManager fragmentManager = getSupportFragmentManager();
        FragmentTransaction fragmentTransaction = fragmentManager.beginTransaction();

        Fragment currentFragment = fragmentManager.getPrimaryNavigationFragment();
        if (currentFragment != null) {
            fragmentTransaction.hide(currentFragment);
        }

        Fragment fragment = fragmentManager.findFragmentByTag(tag);
        if (fragment == null) {
            if (id == R.id.navigation_1) {
                fragment = new FragmentPage1();

            } else if (id == R.id.navigation_2){

                fragment = new FragmentPage2();
            }else {
                fragment = new FragmentPage3();
            }

            fragmentTransaction.add(R.id.content_layout, fragment, tag);
        } else {
            fragmentTransaction.show(fragment);
        }

        fragmentTransaction.setPrimaryNavigationFragment(fragment);
        fragmentTransaction.setReorderingAllowed(true);
        fragmentTransaction.commitNow();


    }

}
3가지의 프래그먼트를 사용하기 위해 위에 처럼 넣어주시면 됩니다.
그리고 프래그먼트를 1~3까지 만들어 주시면 됩니다.
FragmentPage1.java
public class FragmentPage1 extends Fragment {

    @Nullable
    @Override
    public View onCreateView(@NonNull LayoutInflater inflater, @Nullable ViewGroup container, @Nullable Bundle savedInstanceState) {
        setHasOptionsMenu(true);
        return inflater.inflate(R.layout.fragment_page_1, container, false);
    }
    @Override
    public void onViewCreated(@NonNull View view, @Nullable Bundle savedInstanceState) {
        super.onViewCreated(view, savedInstanceState);
    }

}
FragmentPage2.java
public class FragmentPage2 extends Fragment {

    @Nullable
    @Override
    public View onCreateView(@NonNull LayoutInflater inflater, @Nullable ViewGroup container, @Nullable Bundle savedInstanceState) {
        setHasOptionsMenu(true);
        return inflater.inflate(R.layout.fragment_page_2, container, false);
    }
    @Override
    public void onViewCreated(@NonNull View view, @Nullable Bundle savedInstanceState) {
        super.onViewCreated(view, savedInstanceState);
    }

}
FragmentPage3.java
public class FragmentPage3 extends Fragment {

    @Nullable
    @Override
    public View onCreateView(@NonNull LayoutInflater inflater, @Nullable ViewGroup container, @Nullable Bundle savedInstanceState) {
        setHasOptionsMenu(true);
        return inflater.inflate(R.layout.fragment_page_3, container, false);
    }
    @Override
    public void onViewCreated(@NonNull View view, @Nullable Bundle savedInstanceState) {
        super.onViewCreated(view, savedInstanceState);
    }

}
'Android Studio' 카테고리의 다른 글
| 안드로이드 스튜디오 버튼 클릭 횟수에 따라 카운트 증가 (0) | 2020.06.01 |
|---|---|
| 안드로이드 스튜디오 버튼 클릭시 ScrollView(스크롤뷰) 상단, 하단 위치 이동하기 (0) | 2020.06.01 |
| 안드로이드 스튜디오 구글 애드몹 보상형 광고 삽입하기 (0) | 2020.05.27 |
| 안드로이드 스튜디오 웹뷰( WebView)설정하기 (0) | 2020.03.13 |
| 안드로이드 스튜디오 구글애드몹 네이티브 광고(Nativetemplates) 넣기 (1) | 2020.03.13 |